Drywall is a common and useful construction material. However, it is subject to damage over time. When this happens, it can impact your home’s structural integrity and create health risks for you and your family.
From subtle nail pops to serious issues like mold, drywall must be repaired quickly and correctly. Learn the warning signs of drywall repair. Contact Drywall Repair Mesa AZ now!
Drywall is strong and durable, but it’s not indestructible. Over time, gypsum-board walls can sustain small holes, scrapes, and indentations that need to be repaired. Small damage like this is a fairly common occurrence in homes and usually doesn’t require more than some spackle and a bit of smoothing to make it look good again. However, larger holes or even a little water damage can mean that it’s time to call in a professional to handle the repair.
Holes in drywall may seem small and minor, but they can compromise the insulation of your home and allow outside weather and moisture to enter your home. It’s important to address these issues before they become worse, which can be costly. The simplest and least expensive solution is to patch your drywall holes, and most homeowners can complete this task themselves.
Small holes and abrasions are easy to fix with a simple patch kit, some spackle or joint compound (aka “mud”), and a putty knife. The key is to clean the area and then use a small putty knife to smooth out the mud, making sure to feather the edges so it blends in with the rest of the wall. When the mud dries, you can paint it or hire a painting service to paint it for you.
For medium-sized holes, you can purchase a drywall patch kit that will include a drywall patch and the tools needed to apply it to the wall. This technique will require you to screw wooden boards to the back of the drywall on the sides of the hole as backing, and then cut and attach the drywall patch to those boards, much like framing a new wall. Then, you can apply the patch and use joint compound over it to smooth and strengthen the seams.
For large holes, you will need to follow the same steps as for repairing a medium hole, except you will probably need some mesh drywall tape to help strengthen and hold the drywall mud in place. Once the mud dries, you will need to sand the surface using fine-grit sandpaper. If you have a textured wall, you will need to recreate the texture on the patched area in order for it to blend in with the surrounding wall.
Cracks
If the cracks are caused by structural problems such as differential settlement or foundation issues, it’s important to address these underlying issues before trying to repair them. However, if they aren’t a result of these types of problems and simply indicate that the house has settled slightly or was previously constructed with thinner drywall, the cracks can be addressed with simple patching techniques.
Small holes and nail pops can be repaired by removing loose material, applying spackle or a lightweight joint compound with a putty knife and smoothing the surface of the patched area with a drywall sponge. Apply a second application if needed, then feather the edges of the compound into the wall to eliminate obvious transitions and keep the patch looking part of the wall rather than an isolated repair.
For larger holes, Silva shows how to use a drywall patch kit to create a strong, durable fix. First, cut a piece of scrap drywall slightly larger than the hole. Using an electronic stud finder, mark the studs along the edge of the damaged area, then use a drywall saw to remove the damaged section of drywall (Image 2).
Next, apply a strip of drywall tape across the entire surface of the replacement drywall patch, then fill the crack with joint compound and embed the strip in the compound. While the compound is still wet, use a drywall putty knife to smooth out the wrinkles and feather the edges of the tape into the surrounding wall surface.
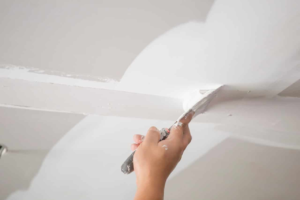
Once the new drywall patch is dry, it’s time to sand it down and prepare it for painting. This is where the importance of a high-quality sandpaper and good technique comes into play. Use progressively finer grits of sandpaper to smooth the patched surface and remove any rough areas that were created during the repair process. This step is essential to a quality finish that looks like an integral part of the wall and not an obvious repair.
When the sanding is complete, a quick touch-up of the paint with a brush will make the patched area indistinguishable from the rest of the wall. For textured walls, it may be necessary to match the texture with a roller or sponge. If your patched wall isn’t painted, you’ll need to prime it as well before re-painting.
Moisture Damage
When water comes into contact with the materials that make up your home’s walls and ceilings, it can cause a lot of damage in a short amount of time. Drywall can become discolored, warped or softened and may even collapse. While minor blemishes can be touched up with spackle or joint compound, severe water damage should only be handled by a professional.
If your drywall has been marred by mold or mildew, it’s a sign that the moisture within your home has reached critical levels and should be addressed immediately. The mold growth is often a result of a leak from a plumbing fixture, roof leaks or other structural issues that need to be fixed right away.
The first step in drywall repair is to remove any damp materials from the affected area and wipe down the remaining surface. It is important to wear respiratory protection when handling moldy or damp materials as they can contain dangerous spores. Next, assess the level of water damage and figure out its cause. If necessary, a mold remediation specialist should be called to remove any existing spores and check for other areas of water damage that could require replacement.
After completing any necessary repairs, the drywall must be allowed to completely dry. This can be accomplished by draining any remaining water, pointing an area fan at the affected wall and plugging in a dehumidifier nearby. It can also help to open windows and doors in the room to encourage air circulation. It takes on average three days for wet drywall to fully dry.
Once the drywall is dry, it is ready to be touched up or repainted. It is important to use a primer when touching up the patched area, as unprimed drywall will absorb the paint and won’t blend in seamlessly with the rest of the wall. If the damaged area is too large to be covered with a patch, then it may be necessary to repaint the entire wall.
While it’s tempting to ignore drywall problems, doing so can lead to more extensive and costly issues in the future. Addressing these drywall issues as soon as possible will save you money, headaches and potential structural problems down the road.
Structural Damage
If your drywall is sagging or cracked in a pattern that resembles “stair-step” cracking, this could indicate structural damage and require professional attention. This type of drywall problem usually accompanies a foundation issue that requires professional help to resolve. Structural issues are best addressed by a licensed contractor who can provide a thorough inspection and appropriate repair solutions.
In addition to cracks, drywall can be damaged by other events and conditions that affect its stability. Stains, swelling, soft spots, and mold or mildew can all cause deterioration that compromises the structure of your home. If not promptly addressed, these problems may result in the need to replace entire sections of your home’s drywall.
Damage to drywall can also occur from impacts to your home’s walls and ceilings, or from the installation and removal of fixtures. These problems can be addressed by replacing the damaged drywall, or by painting over the affected area. Minor blemishes on your wall’s surface can be touched up with a dab of paint that blends into the existing color, but larger areas will require patching and repainting to cover the repair.
Drywall is a popular construction material because it’s durable, affordable, and easy to install. However, even this durable material can be damaged by many of the same problems as wood-framed walls. Knowing the top sources of drywall damage will help you prevent these problems and keep your home’s walls in good condition.
Drywall Repair begins with a visual inspection of the damaged wall, including examining the surrounding area for signs of moisture damage like softness or discoloration. If a visual inspection doesn’t reveal the source of the damage, you can use a moisture meter or other testing equipment to assess the integrity of your drywall. If you find a problem, it’s best to call a professional for drywall repairs, as they will be faster and more effective than a DIY solution. In addition, professionals can assess the extent of the damage and address any underlying issues to prevent future drywall problems.